> ## Documentation Index
> Fetch the complete documentation index at: https://docs.fatorly.com/llms.txt
> Use this file to discover all available pages before exploring further.
# Create or Edit an Invoice
> A step-by-step walkthrough of the redesigned editor for invoices and credit notes.
The invoice editor is where you create and edit documents — tax invoices,
commercial invoices, and credit notes. It calculates VAT and totals **live as you
type** and validates each document against the UAE PINT (PINT AE) rules, so
problems surface before you submit.
 ## Start a new document
You can launch the editor from several places:
* **Dashboard → Quick Actions** (e.g. *New Tax Invoice*).
* **Sales → New Tax Invoice / New Commercial Invoice**.
* **Sales Credit Notes → New Credit Note**.
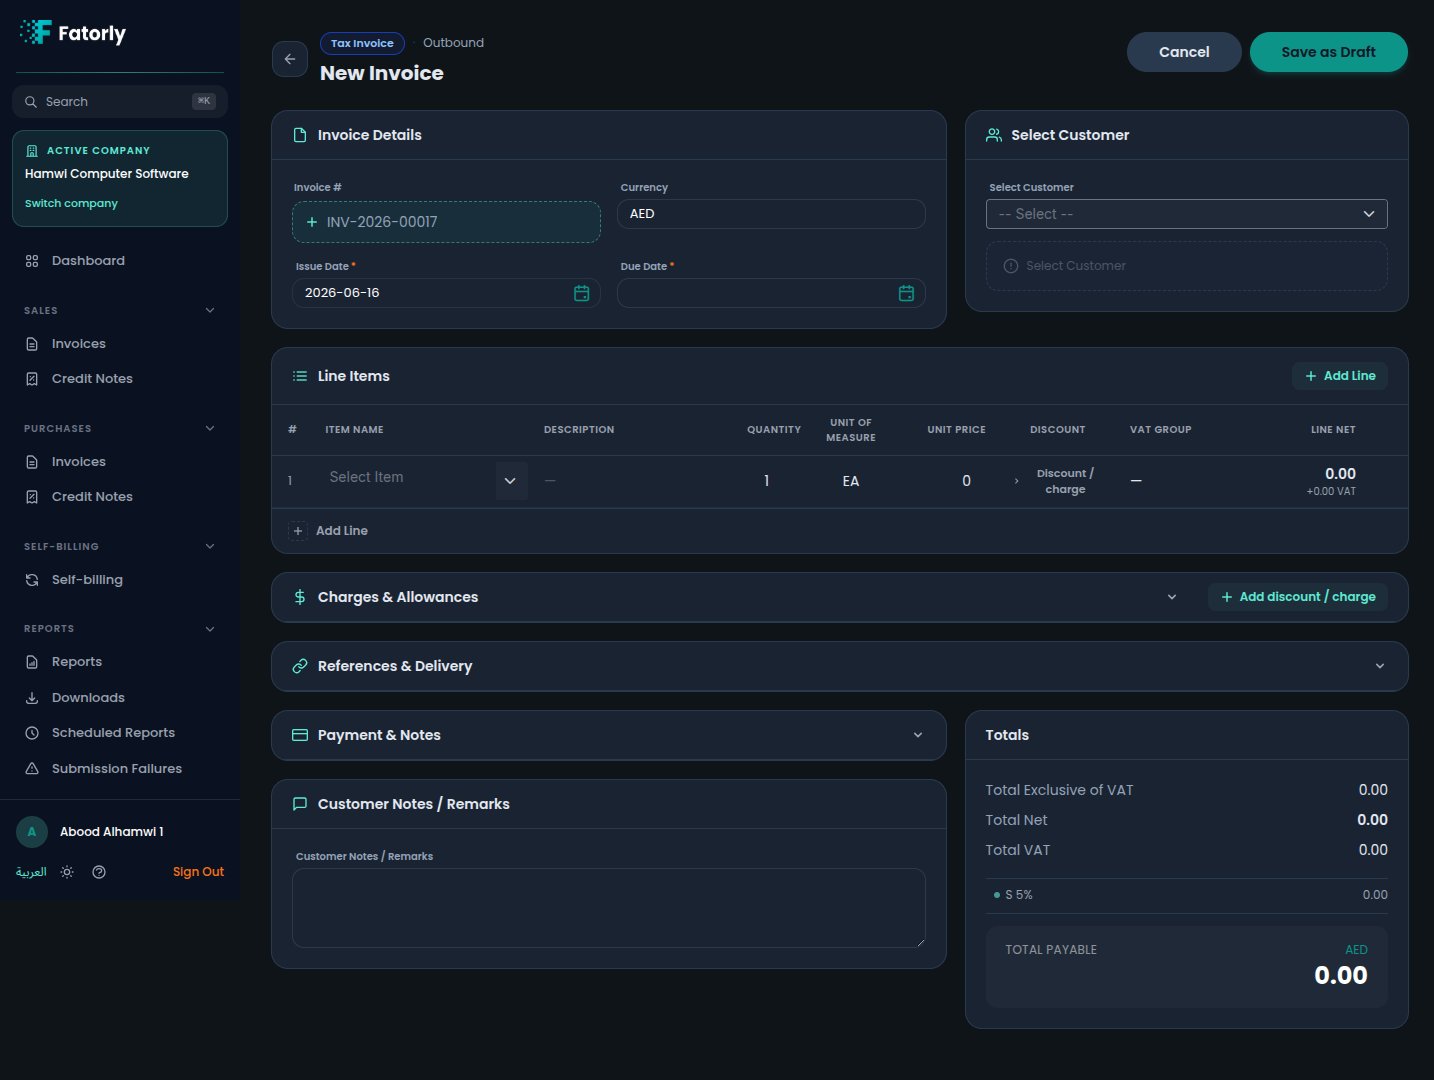
The header bar at the top shows the document **category** (for example
*Tax Invoice*) and its **direction** (*Outbound*), alongside the **Cancel** and
**Save as Draft** buttons.
## Fill in the document
Work top to bottom. The first three areas — **Invoice Details**, **Select
Customer**, and **Line Items** — are always visible. The three sections below
them are optional and collapsible.
In the **Invoice Details** card, the **Invoice #** is assigned automatically
from your [number series](/en/settings/number-series) (for example
`INV-2026-00017`) and is read-only. Set the **Currency** (defaults to `AED`),
the **Issue Date** (defaults to today), and the **Due Date**. If VAT becomes
due on a date different from the issue date, use the optional **VAT Point Date**
date picker (BT-7; not available on credit notes).
In the **Select Customer** card, search the dropdown and pick the buyer. The
card then shows the chosen customer's name, TRN, and address. Manage these
records in [Customers](/en/master-data/customers).
In the **Line Items** table, choose **Add Line** for each product or service.
* Pick an **Item** to prefill the name, **Unit of Measure**, **Unit Price**,
and the item's default tax category and classification (set these up in
[Items](/en/master-data/items)). You can also type a free **Description**.
* Set the **Quantity** and adjust the **Unit Price** if needed. Use the
**Discount / charge** button on a line to add a per-line allowance or charge.
* Choose the **VAT Group**: `S` (5%), `Z` (0%), `E` (0%), `O` (0%),
`AE` (0%), or `L` (0%). New lines default to the **5% standard** group (`S`).
* When the VAT Group is **`E` (Exempt)**, an **Exemption Reason** field
appears and is required.
* Expand the line to set **Item Type** (`G` Goods, `S` Services, or `B` Both).
This reveals the **Service Accounting Code (SAC)** field for service lines,
and the **Goods Nature Code** for reverse-charge (`AE`) goods lines.
## Start a new document
You can launch the editor from several places:
* **Dashboard → Quick Actions** (e.g. *New Tax Invoice*).
* **Sales → New Tax Invoice / New Commercial Invoice**.
* **Sales Credit Notes → New Credit Note**.
The header bar at the top shows the document **category** (for example
*Tax Invoice*) and its **direction** (*Outbound*), alongside the **Cancel** and
**Save as Draft** buttons.
## Fill in the document
Work top to bottom. The first three areas — **Invoice Details**, **Select
Customer**, and **Line Items** — are always visible. The three sections below
them are optional and collapsible.
In the **Invoice Details** card, the **Invoice #** is assigned automatically
from your [number series](/en/settings/number-series) (for example
`INV-2026-00017`) and is read-only. Set the **Currency** (defaults to `AED`),
the **Issue Date** (defaults to today), and the **Due Date**. If VAT becomes
due on a date different from the issue date, use the optional **VAT Point Date**
date picker (BT-7; not available on credit notes).
In the **Select Customer** card, search the dropdown and pick the buyer. The
card then shows the chosen customer's name, TRN, and address. Manage these
records in [Customers](/en/master-data/customers).
In the **Line Items** table, choose **Add Line** for each product or service.
* Pick an **Item** to prefill the name, **Unit of Measure**, **Unit Price**,
and the item's default tax category and classification (set these up in
[Items](/en/master-data/items)). You can also type a free **Description**.
* Set the **Quantity** and adjust the **Unit Price** if needed. Use the
**Discount / charge** button on a line to add a per-line allowance or charge.
* Choose the **VAT Group**: `S` (5%), `Z` (0%), `E` (0%), `O` (0%),
`AE` (0%), or `L` (0%). New lines default to the **5% standard** group (`S`).
* When the VAT Group is **`E` (Exempt)**, an **Exemption Reason** field
appears and is required.
* Expand the line to set **Item Type** (`G` Goods, `S` Services, or `B` Both).
This reveals the **Service Accounting Code (SAC)** field for service lines,
and the **Goods Nature Code** for reverse-charge (`AE`) goods lines.
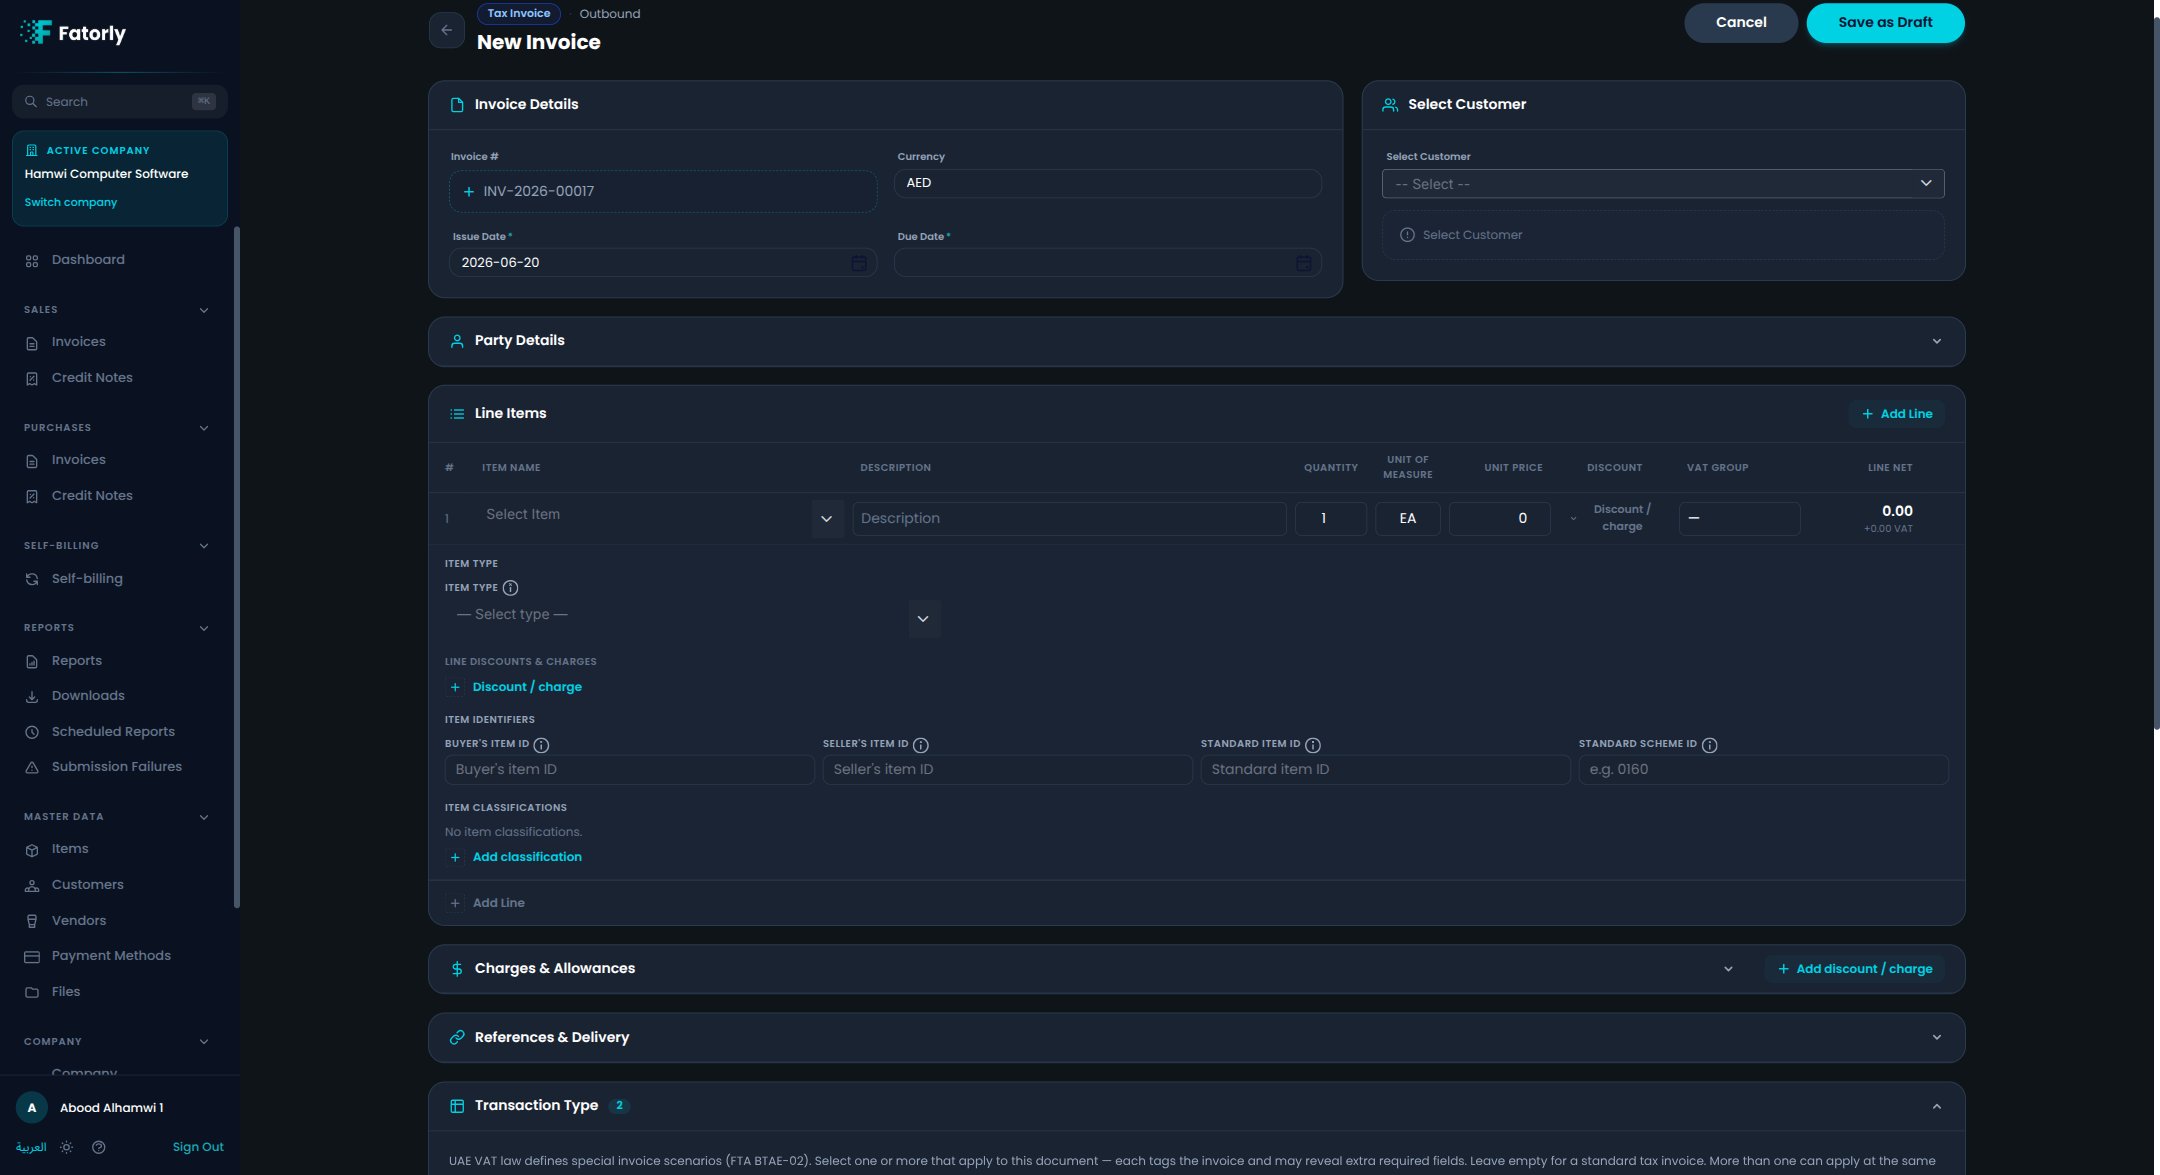 The **Line Net** is calculated for you as quantity × unit price, minus
allowances plus charges.
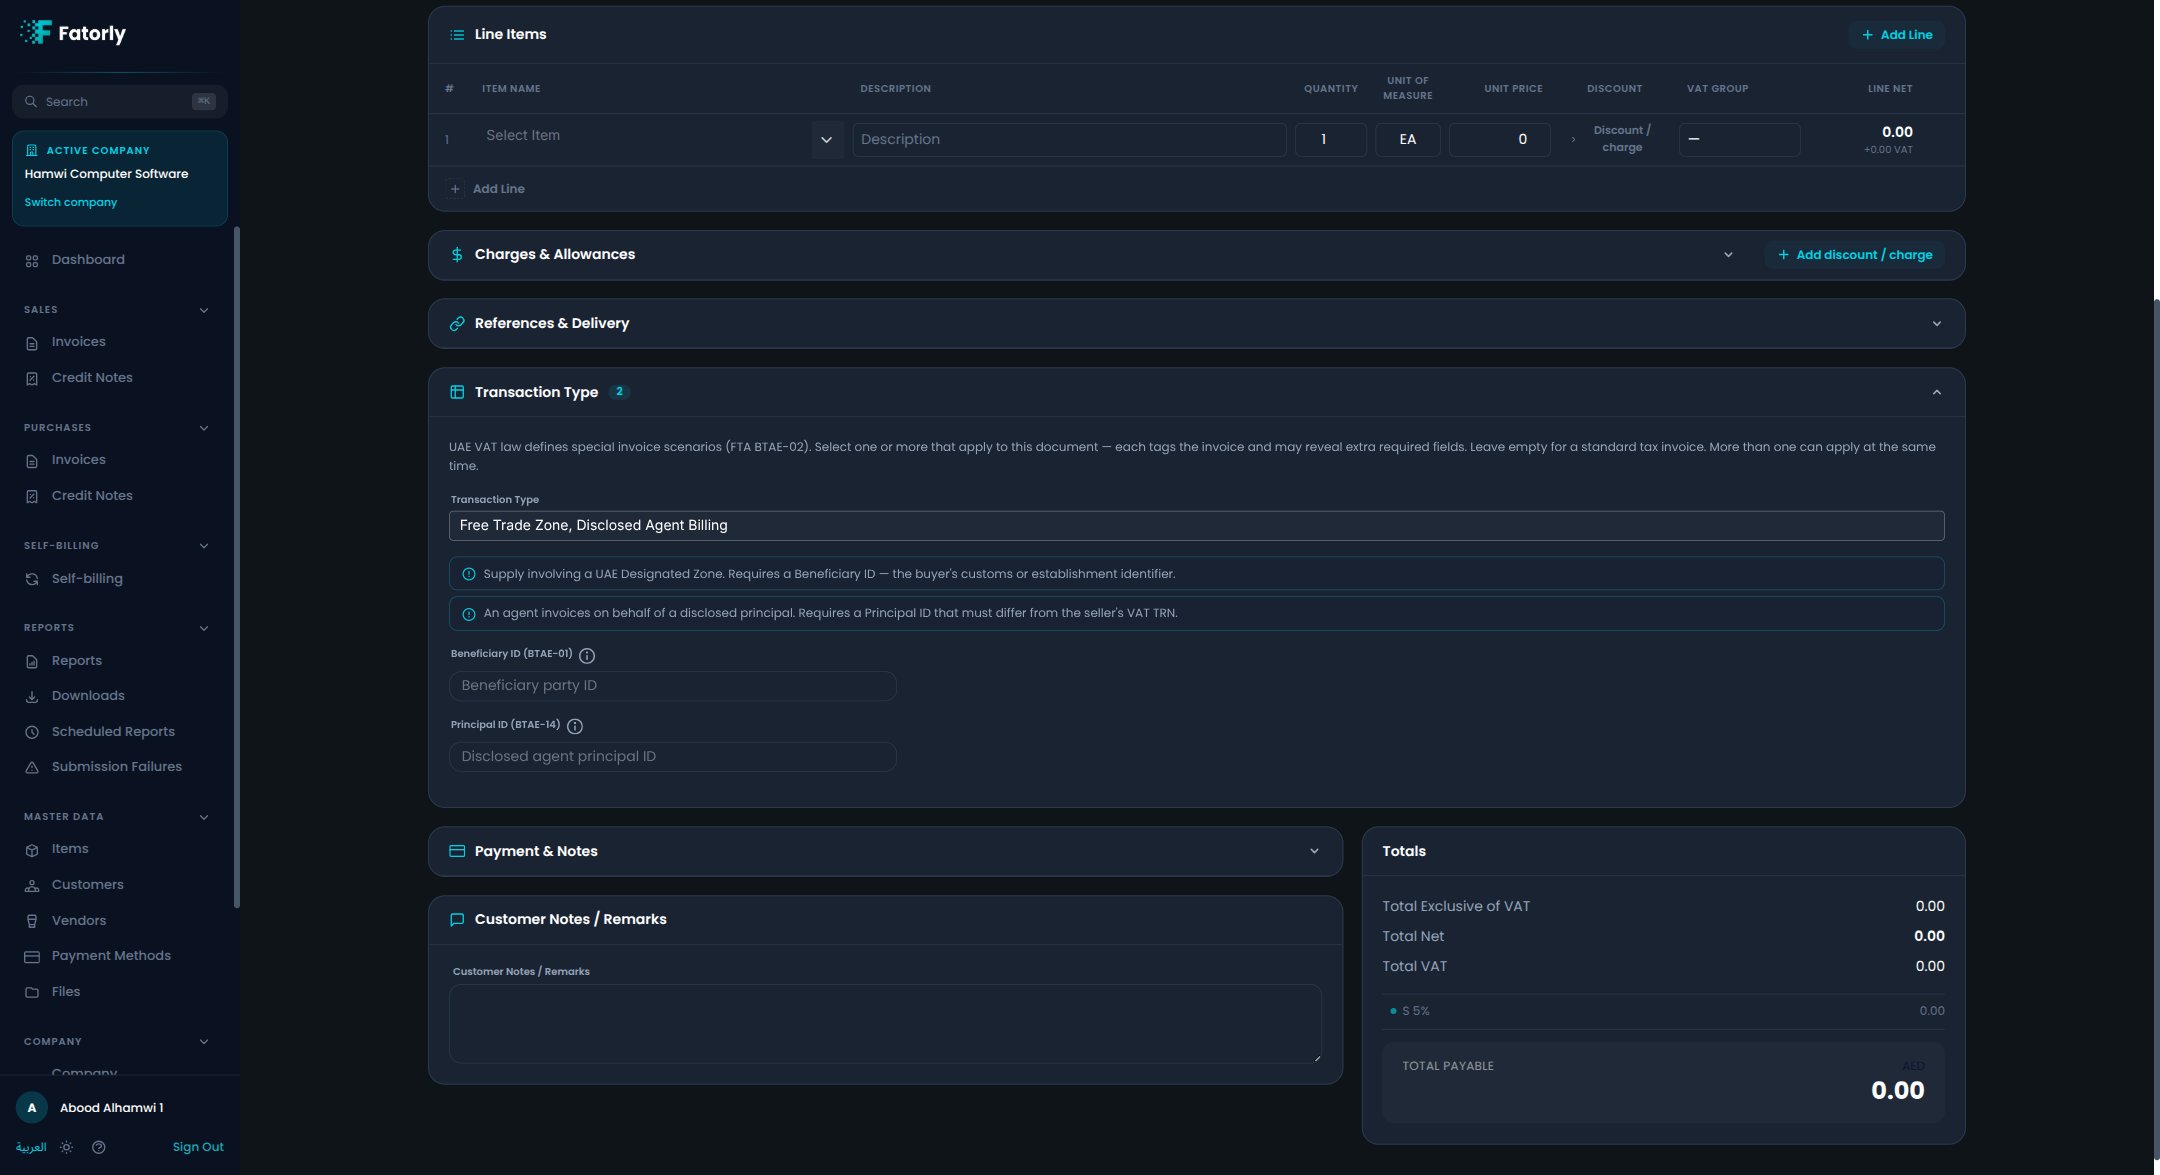
Expand the **Transaction Type** section if this invoice involves one or more
UAE special scenarios — for example a Free Trade Zone supply, a Disclosed
Agent Billing arrangement, a Summary Invoice, or an Export. Tick the relevant
scenarios; the form reveals the additional fields each one legally requires
(such as **Beneficiary ID**, **Principal ID**, or a **Billing Period**). Leave
the section empty for a standard tax invoice.
The **Line Net** is calculated for you as quantity × unit price, minus
allowances plus charges.
Expand the **Transaction Type** section if this invoice involves one or more
UAE special scenarios — for example a Free Trade Zone supply, a Disclosed
Agent Billing arrangement, a Summary Invoice, or an Export. Tick the relevant
scenarios; the form reveals the additional fields each one legally requires
(such as **Beneficiary ID**, **Principal ID**, or a **Billing Period**). Leave
the section empty for a standard tax invoice.
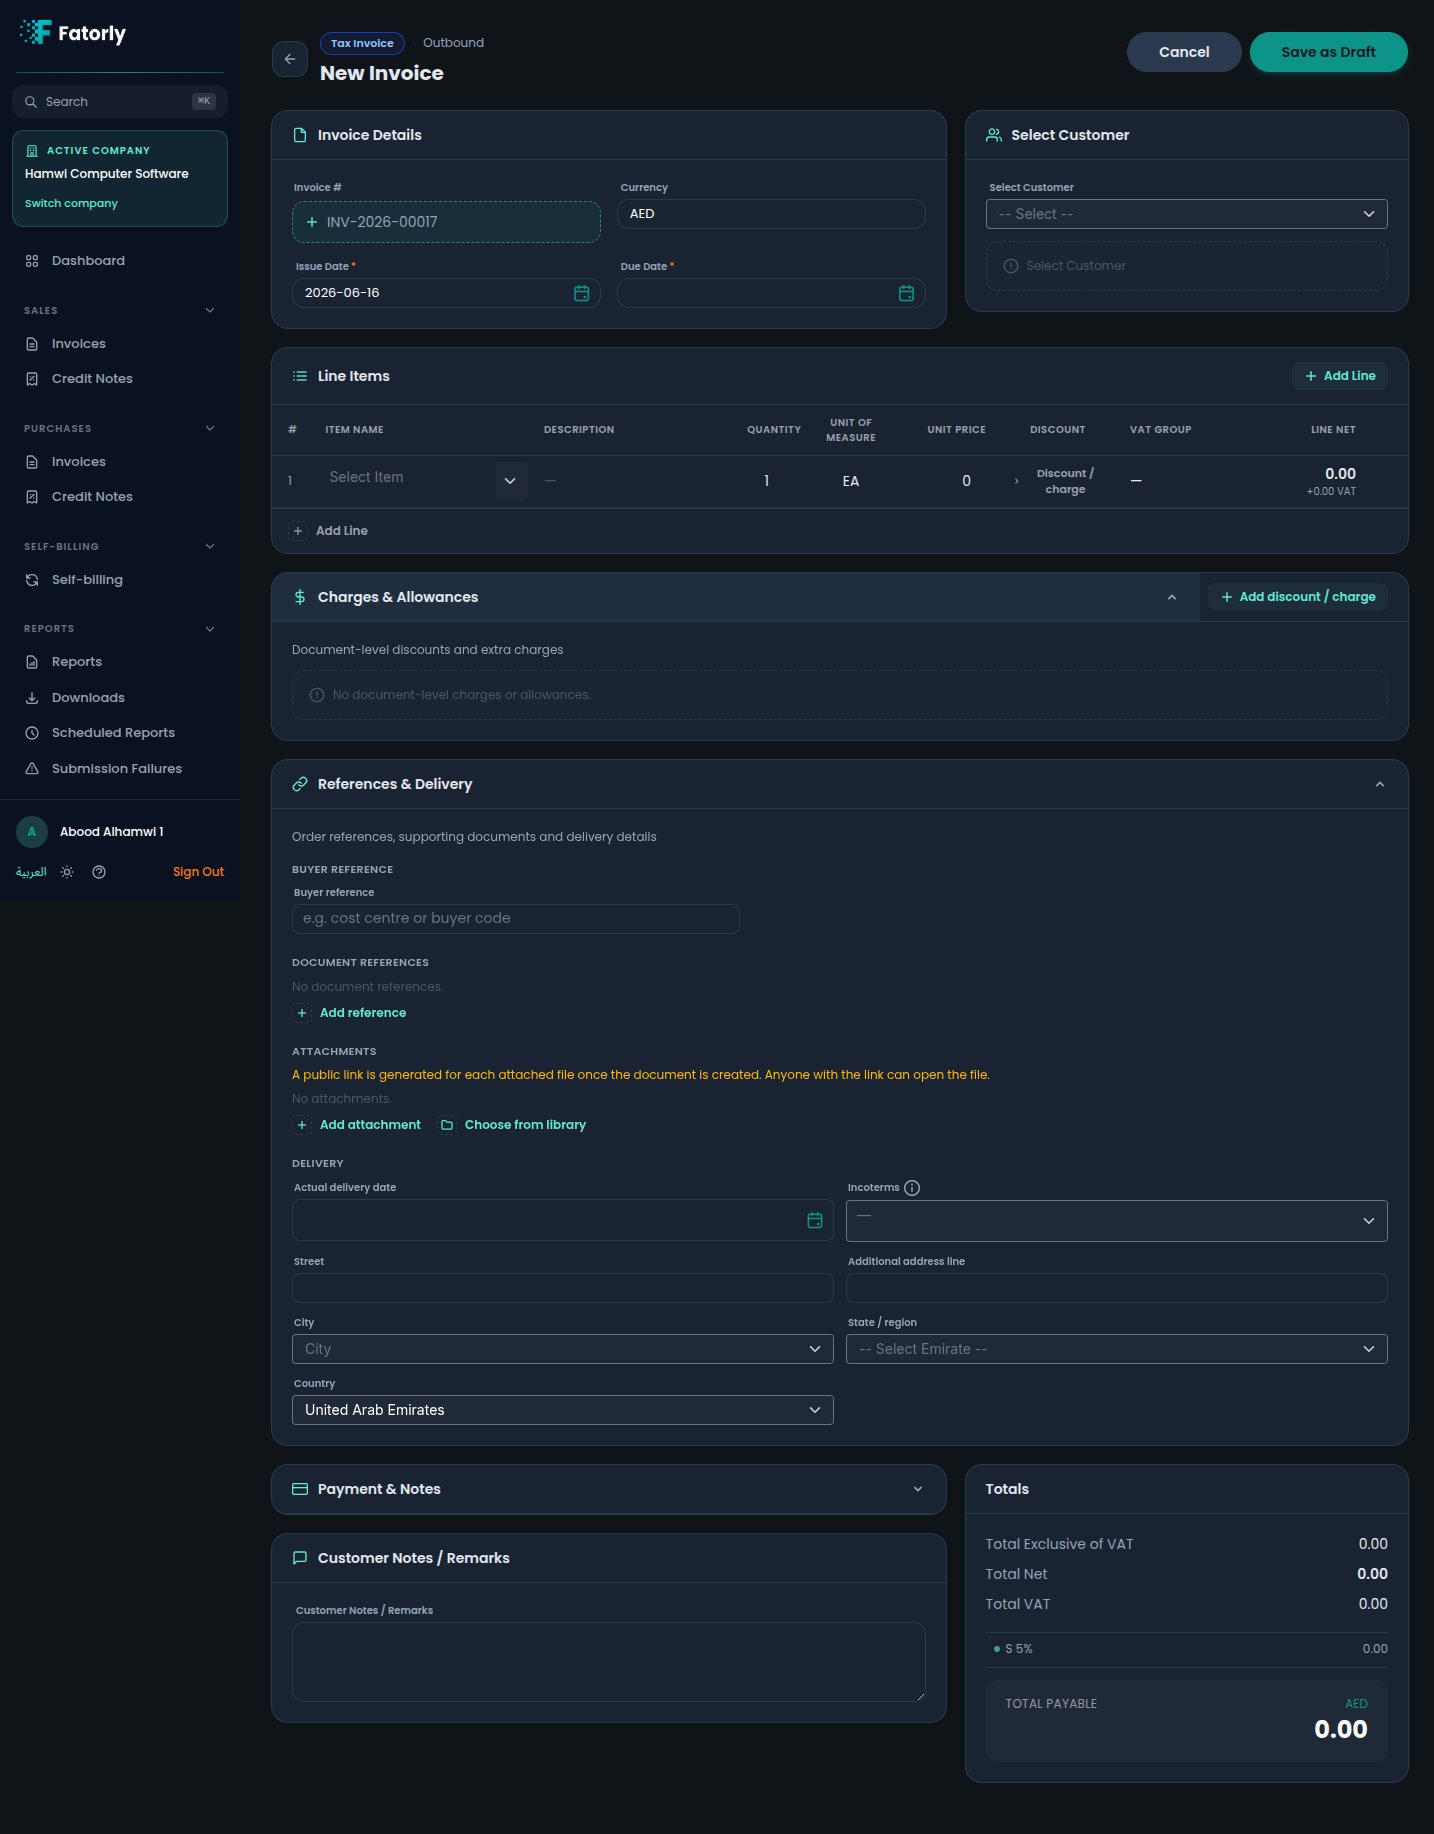
 Expand **Charges & Allowances** to add discounts or charges that apply to the
**whole document** rather than a single line. Choose **Add discount / charge**,
set whether it is an allowance or a charge, the amount, the tax category, and
a reason.
Expand **References & Delivery** to record a **buyer reference**; purchase
order, sales order, contract, project, despatch, or receipt references;
**attachments** (from your [Files library](/en/files/files-library), an
upload, or a URL); and **delivery** details — address, actual delivery date,
and Incoterms. The delivery **Country**, **Emirate**, and **City** are
dropdowns.
Expand **Payment & Notes** to choose a **Payment Method** and **Payment
Terms**, and to add **Customer Notes / Remarks** that appear on the document.
You can also enter a **Bank Account / IBAN** (required for credit-transfer
payments) and a **Prepaid Amount** (BT-113) if the buyer has already made an
advance payment.
The **Totals** panel updates live and is read-only: **Total Exclusive of
VAT**, **Total Net**, **Total VAT** broken down per category (for example
`S 5%`), and **Total Payable** in the document currency (`AED`).
Choose **Save as Draft**. The document is saved and can be reviewed, then
submitted from the [invoice view](/en/invoicing/view-invoice).
Expand **Charges & Allowances** to add discounts or charges that apply to the
**whole document** rather than a single line. Choose **Add discount / charge**,
set whether it is an allowance or a charge, the amount, the tax category, and
a reason.
Expand **References & Delivery** to record a **buyer reference**; purchase
order, sales order, contract, project, despatch, or receipt references;
**attachments** (from your [Files library](/en/files/files-library), an
upload, or a URL); and **delivery** details — address, actual delivery date,
and Incoterms. The delivery **Country**, **Emirate**, and **City** are
dropdowns.
Expand **Payment & Notes** to choose a **Payment Method** and **Payment
Terms**, and to add **Customer Notes / Remarks** that appear on the document.
You can also enter a **Bank Account / IBAN** (required for credit-transfer
payments) and a **Prepaid Amount** (BT-113) if the buyer has already made an
advance payment.
The **Totals** panel updates live and is read-only: **Total Exclusive of
VAT**, **Total Net**, **Total VAT** broken down per category (for example
`S 5%`), and **Total Payable** in the document currency (`AED`).
Choose **Save as Draft**. The document is saved and can be reviewed, then
submitted from the [invoice view](/en/invoicing/view-invoice).
 The three optional sections — **Charges & Allowances**, **References &
Delivery**, and **Payment & Notes** — are collapsible. Each shows a
**filled-count badge** so you can see at a glance how much it contains, and a
section **auto-expands** if it holds a field with a validation error. Fields have
visible labels, and non-obvious ones carry an info "i" tooltip.
This page is a walkthrough. For the full list of **every field** — whether it is
required and the values it accepts — see the
[Invoice Field Reference](/en/invoicing/invoice-field-reference).
## Related
* [Items](/en/master-data/items) — the catalog that prefills line items.
* [Customers](/en/master-data/customers) — the buyers you select.
* [Number Series](/en/settings/number-series) — where invoice numbers come from.
* [Files](/en/files/files-library) — the library you attach documents from.
* [View an Invoice](/en/invoicing/view-invoice) — what happens after you save.
The three optional sections — **Charges & Allowances**, **References &
Delivery**, and **Payment & Notes** — are collapsible. Each shows a
**filled-count badge** so you can see at a glance how much it contains, and a
section **auto-expands** if it holds a field with a validation error. Fields have
visible labels, and non-obvious ones carry an info "i" tooltip.
This page is a walkthrough. For the full list of **every field** — whether it is
required and the values it accepts — see the
[Invoice Field Reference](/en/invoicing/invoice-field-reference).
## Related
* [Items](/en/master-data/items) — the catalog that prefills line items.
* [Customers](/en/master-data/customers) — the buyers you select.
* [Number Series](/en/settings/number-series) — where invoice numbers come from.
* [Files](/en/files/files-library) — the library you attach documents from.
* [View an Invoice](/en/invoicing/view-invoice) — what happens after you save.